Bread Bowl from a Bun

Inspiration for Bread-bun Soup Bowls
Bread has been used throughout history in a wide variety of ways to eat food. From flat breads used for dipping in sauces and rolling up one's favourite filling, to being pulled apart and served with stews, to being turned into sandwiches in more modern times, bread has been busy!
The bread bowl entered the scene in the middle ages from what little I've been able to dig up on the subject. Typically a bread bowl uses an entire small loaf of bread to make a fairly sizeable soup bowl that can be eaten when the soup is gone.
The concept for a bread-bun soup bowl came to me as a quick way to feed a small crew of people on a budget.

Cooking Time if doing one bun
Ingredients
- Olive Oil
- Dinner Bun, larger kind, up to kaiser-bun size
The 15min cooking time stays the same no matter how many buns you are doing. The 28 buns I did took the same length of time in the larger oven as this one did.
Instructions in Pictures


Bread-bun bowl quiz
view quiz statisticsInstructions in Text
- 1) Take a sharp knife, I used a steak knife. Place the bun on it's flat bottom on your work surface and look at the top of the bun. You want to leave as much bun available as possible while obtaining the widest interior possible. So take the knife and begin slicing across the top of the bun, from the outermost edge you hope to ring your bowl, to the farthest edge you are after. Instructions I've located that talk about large bread bowls encourage leaving at least 1.5″ available as side walls and base. However, because these are dinner buns here, the best we can hope for is maybe a half inch to 3/4″ around the outside.
- 2) Once you've cut off the top, take the sharp knife and insert it at the inner edge of the bun now, beside the exposed soft interior. Be careful you don't push the tip all the way to the bottom of the bun. Try to leave at least a half inch on the bottom to prevent leakage.
- 3) After you've cut all the way around the exposed softer bread, remove the knife and using clean fingers, pull out the "plug". You'll notice that the bread center will pull out at roughly the depth you had cut with your knife. Set the bread plug aside for use in dipping.
- 4) Pour some olive oil into a small to medum sized bowl, and liberally apply it to the interior of your bread bun soup bowl. I tried to use a basting brush for this and ended up using my fingers. I also lightly slathered some on the outside of the bun to seal it externally as well.
- 5) Place buns on cookie sheet and place in 350F oven for at least 15 minutes or until the bun turns golden. For my oven, that turned into 25 minutes.

Final notes
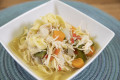
The bun comes out very crispy inside and out. This allows for one or two servings of thin-broth soup, or 2 to 4 or more servings of cream or thick-broth soups. When the diner begins to notice the bun going soft, it's time to eat the bun and grab another if they want more soup. The bread bun cores are great dippers to dip in your soup and enjoy, or to serve in other ways. Some people have chopped up the cores into cubes, spiced and then dried them for croutons. Others have cubed them for dipping in sauces.
Needless to say, these little bowls were an all-out hit for the setup crew! My grown kids like them too.
My crew loved this! Do you?
© 2014 Marilynn Dawson

 Back to Basics: Types of Sandwiches")